FR
Topgunbase is a platform for Wingsuit Basejumping Academic Education. We have a pretty intimidating range of topics to cover. One person cannot cover it all. Too much knowledge, too many sub-specialties. Collaboration with experts in the field is mandatory. To that end, TGB welcomes written content from current and proficient wingsuit pilots, especially if you have a niche specialty that only a few truly understand. We welcome any suit, any language, any brand. Politely leave your egos and alliances at the door. In our game, knowledge is life to be shared, not secrets to be kept hidden.
Our first guest contributor on Topgunbase needs no introduction. It is my pleasure to welcome Mr. Matt Gerdes, as he submits the final installment on our 3-part Speed series. His article can also be found on base-book.com.
– TGB
This article can be read alone, but is also part 3 in a series.
Part 1: Why Fly Fast?
Part 2: Stability vs Drag
Part 3: Speed to Fly
One of the more important skills in wingsuit flying is the ability to fly fast safely in formation with your friends. Much of what you need to know about flying well, can be learned from practicing this one skill. In parts 1 and 2, Richard Webb explained to us what speed means in terms of safety in wingsuit flight, and how to understand the relationship between stability and drag. In this third part, let’s try to understand how to get our speed on.
The aim of this article is to clarify some points on wingsuit flight, and to encourage pilots to learn to fly fast. Words are thoughts, and in order to think clearly about our progression we need to cut inaccurate terminology from our sport. I want to believe that you are willing to take the time to try and understand more than opening or closing your butt cheeks (see fig. 1b). It’s fun to pretend to be an airplane, but your ass is not an elevator.
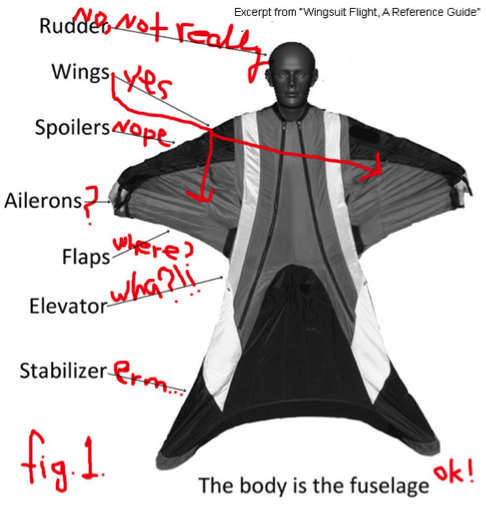
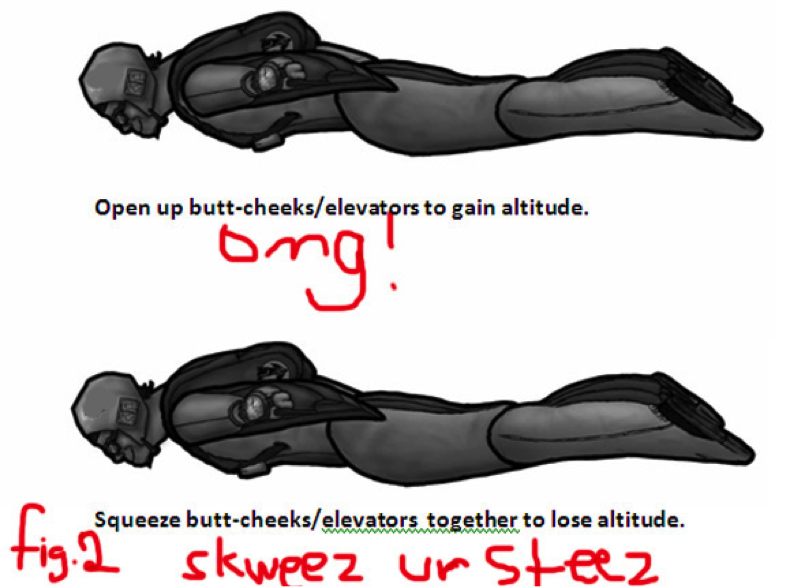 Figure 1a, 1b. That’s my red pen, over illustrations in a wingsuit training manual that can still be found on dropzone.com! Parts of said manual seem to have been written by a con-man.
In this article, we will try to explain two separate fundamentals of wingsuit flight: Angle of Attack, and Wingsuit Configuration (formerly known as “Body Position”). We will examine how separating these two concepts and thinking about them independently may help us to fly better.
What is Wingsuit Performance, Anyway?
Wingsuit pilots often ask us what “tricks” we recommend for increasing performance. Many of the tips we have heard are based on the idea that “performance flying” is gliding for distance at flat, slow, minimum-sink angles. While flying slowly is not always a problem in the skydiving environment, it is not ideal. So how fast should we be going in any given situation? This concept in gliding flight is sometimes referred to as “Speed to Fly”. Luckily, for wingsuit flying it’s not that complicated. The answer to this question is, generally: “As fast as possible”.
The idea that “speed is good” is surprisingly uncommon in today’s world of wingsuit instruction. I am of the opinion that a fundamental misunderstanding of proper airspeeds has led to unnecessary wingsuit BASE fatalities in which pilots have been without the skill resources needed to assess or complete a line of flight. Many skydivers are being taught to fly their wingsuits too slowly to make use of their suit’s full potential, and many more totally lack an understanding of what healthy forward speed is. While this is not just a wingsuit BASE issue, from August 2015 to October 2016 more than 10 BASE fatalities can be attributed to improper airspeed.
So, when we want to fly our wingsuits at max performance, what do we mean? Is max performance flying far, or flying fast, or flying for a long period of time? I would argue that the most important aspect of performance flight to focus on is horizontal speed with precision and control.
Performance flying is fast flying:
In skydiving, a common measure of performance is “vertical speed”, which is also referred to as “sink rate” in gliding flight. Regardless of what it’s called, the concept we must grasp is that a low sink rate is not something that we should be concerned with. I don’t believe that we should be focused on reducing vertical speed. It is more important to train for a high horizontal speed.
The best way to train horizontal speed is to fly side by side with your friends, as close as is possible / comfortable / safe. Edge ahead of the friend next to you, forcing him to adjust his wingsuit configuration (formerly known as body position) and AoA to overtake you – then use him as a reference to pass, again. Training for speed in small formations of two to three pilots will allow you to use one another as reference points to gauge performance adjustments. Keep your first speed formations small, at three pilots max, to begin with. Safety in formations and proper flight patterns are a completely different chapter, but a small group flying close together in the same direction is the basic idea.
|
SIDE BAR: INSTRUMENTS Using a GPS or audible device such as a Flysight can be very useful for broad estimates, but don’t get too caught up in the minutiae of recorded data. GPS instruments are generally an inaccurate way to judge wingsuit performance due to the difference between airspeed (how fast you are actually flying) and groundspeed (what your GPS measures). Over the course of many jumps, and taking into consideration winds aloft forecasts and the winds reported by your pilot, a GPS can be a productive tool only if you aren’t making fine comparisons from jump to jump. Your speed readings will vary by 20+ mph from day to day depending on the altitude of your speed run, the wind conditions, and even slight heading changes in said conditions. Because of this inherent variability, we do not use GPS devices to test for speed; we rely solely on side-by-side comparisons between two pilots of similar size*. While recorded data is not a useful or reliable way to gauge performance, an audible Flysight is a useful tool when flying solo. Audible feedback set to horizontal speed will help you to find the fastest position, and angle, while you are flying. *(The differences between the highest performance wingsuit prototypes are often less than 2mph airspeed, but it is nearly impossible to fly through 10,000 feet of altitude on a skydive without encountering significant (as in >5mph) vertical and horizontal movement in the airmass, rendering instrument data comparisons mostly useless within such a narrow range of performance. Side by side testing is best).
|
Three Performance Facts:
- As our horizontal speed increases, our sink rate (vertical speed) will also increase* (*except when pulling out of a dive). Remember that it is ok to go down faster! Train for max horizontal speed, not min vertical speed. In this green zone, horizontal speed is the focus.
- If we decrease our sink rate while optimizing our angle, we increase glide performance. However, best glide (or MID speed, see sidebar) is not the healthiest speed to fly in a wingsuit because it is relatively close to stall and leaves us with less power in reserve (less speed equals less available lift, less kinetic energy, and zero power to increase glide performance if it becomes necessary). Do not make a habit of sacrificing speed for glide! (Orange zone).
- It is possible to decrease sink rate below the point of best glide, resulting in slow forward speed and a low sink rate (low vertical speed). Focusing on “time”, or reducing vertical speed to a minimum, teaches near-stall flight and poor glide performance. This slow speed, near-stall flight, is one of the most common bad habits in wingsuit flying. (Red zone).
The polar curve below will help us to understand the relationship between glide, speed, and sink rate. Remember that in wingsuit flying, training for “best glide” or “lowest vertical speed” can reinforce bad habits. That doesn’t mean you should never do it, but, when training for these skills, maintain an awareness of the importance of horizontal speed.
On the wingsuit polar curve, note that the Stall Speed, Min Sink speed, and Best Glide speed are all marked. Beyond the best glide speed, the wingsuit airspeed increases together with the sink rate – as we fly faster, we descend faster, which is not a bad thing.
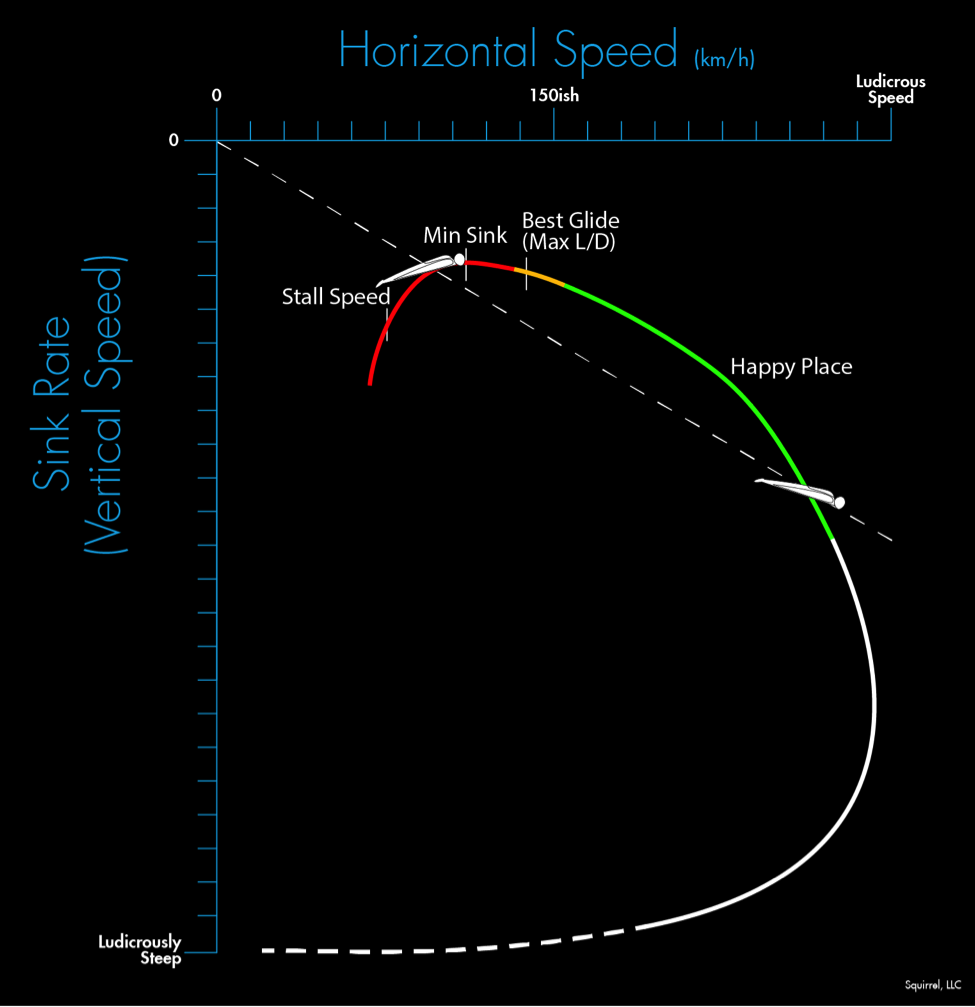 Figure 2. Polar Curve. To increase horizontal speed, one must increase vertical speed. Repeat after me: It’s ok to go down faster, It’s ok to go down faster…
|
SIDEBAR: M.I.D. SPEED Rich Webb says: “Since there is nothing ‘best’ about Best Glide, I’d like to coin a new term for ‘best glide’ for us inefficient wingsuiters: Maximum Impact Distance Speed (M.I.D. Speed). This helps weaken the subconscious suggestion that flying wingsuits at ‘best glide’ is ‘best’. It’s not, most of the time. Flying at MID Speed will get you to the farthest possible impact point. If you fly either faster or slower than MID Speed, you WILL impact shorter, guaranteed. However, flying significantly faster than MID Speed over suitable terrain will also give you increased available lift and maneuvering capability, making you a safer wingsuit pilot. Flying routinely AT or BELOW MID Speed will not give you any margin for maneuvering or flaring, making you an accident waiting to happen. MID Speed also has a nice mnemonic ring to it… MID helps us remember that MID Speed is in the middle, between Min Sink Speed and Max Horizontal Speed, and is not necessarily a Target speed for normal flight (as ‘best glide’ subconsciously implies)” |
We want to keep our airspeed well above the point of best glide (MID Speed). That green section on the polar curve where airspeed and sink rate increase is our ideal speed range for both skydiving and BASE jumping. This is the speed range that allows us to use retained energy to increase our glide performance in order to extend our glide path or disconnect from terrain, but is not so steep as to be uncomfortable or inefficient.
Training to keep yourself at (MID) best glide airspeeds can result in a tendency to fly too slowly, too close to stall, and with zero energy reserves to increase your glide when the need arises. In short, the closer you fly to “best glide” (Maximum Impact Distance speed), the less available lift, or “reserve”, you have in store. Flying a wingsuit safely means having enough airspeed to significantly increase your glide or make a significant course correction without stalling your wingsuit.
|
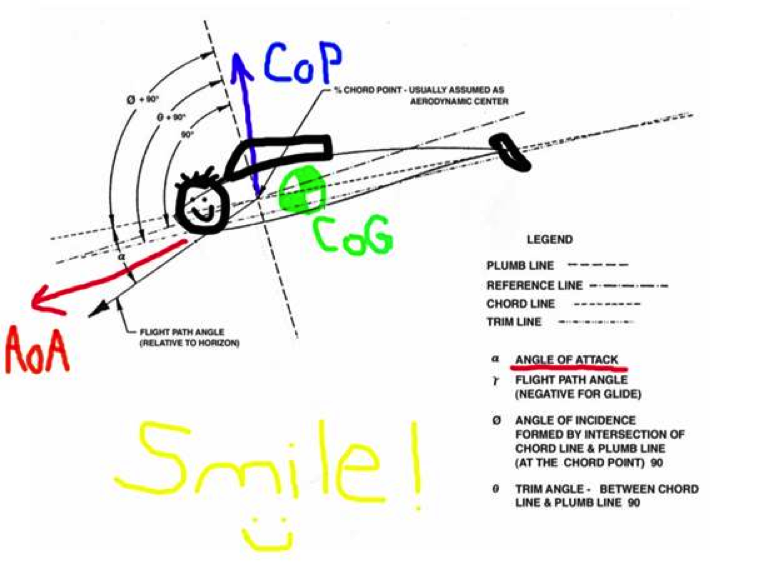
SIDE BAR: COCKPIT ALARMS You can practice flying at each segment of the polar curve in order to learn what each segment feels like. Practice flying at min sink, near stall, and practice stalling your wingsuit. The “red zone” should be a familiar feeling, so that if you ever find yourself there inadvertently, you should be hearing cockpit alarms in your brain. If you are looking at a line of flight that requires best-glide / min-sink / near-stall flight, alarms should be sounding in your head well before you commit to it. Low speed flight kills wingsuit pilots in the BASE environment. SIDEBAR: WHERE IS YOUR CENTER OF GRAVITY? The wingsuit center of gravity (CoG) is often behind the center of pressure (CoP), meaning the natural tendency of some wingsuits is to fly head-high. The center of gravity and the center of pressure (where the lift force is concentrated) on an airplane are usually located very close together. Wingsuits are sometimes different. An average human’s center of gravity is located anterior to the sacral spine, or around your belly button. The center of pressure on a wingsuit is generally located higher (more forward) but CoP moves with changes in Angle of Attack. Imagine that you are being suspended by lift from between your shoulder blades, but your CG is at your belly button: you will tilt head-high. Because of this, many wingsuit pilots have a natural tendency to fly too flat, and too slowly, settling into a position that is too head-high. It requires conscious physical effort to pilot your wingsuit into a steeper angle of attack. Flying too “flat” is the single most common error in wingsuit flying, and the most common bad habit. Without a certain amount of airspeed, wingsuits don’t work well. Airspeed in gliding flight comes from angle… so keep reading. Many instructors teach their students to fly flat, slow, and close to stall, thereby building a boring and dangerous foundation for their student’s wingsuit career. If your wingsuit instructor tells you to “open your butt-cheeks”, beware! |
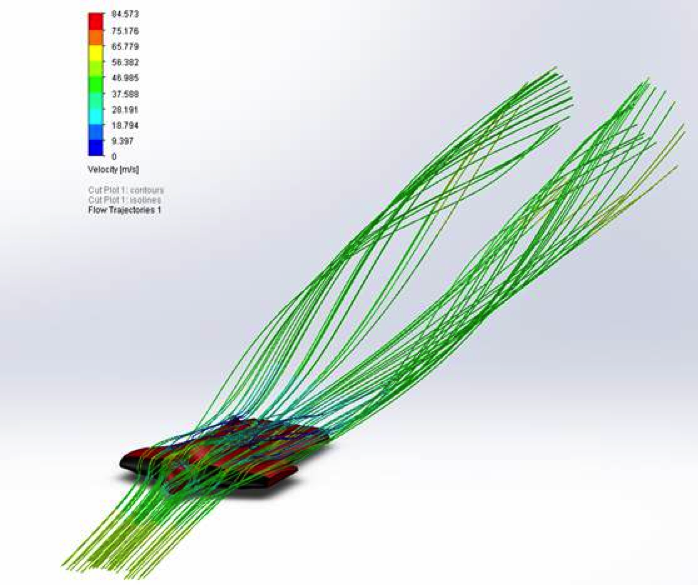 Figure 3. Flow modeling a Squirrel wingsuit in CFD. Rotation of the induced drag vortices are visible.
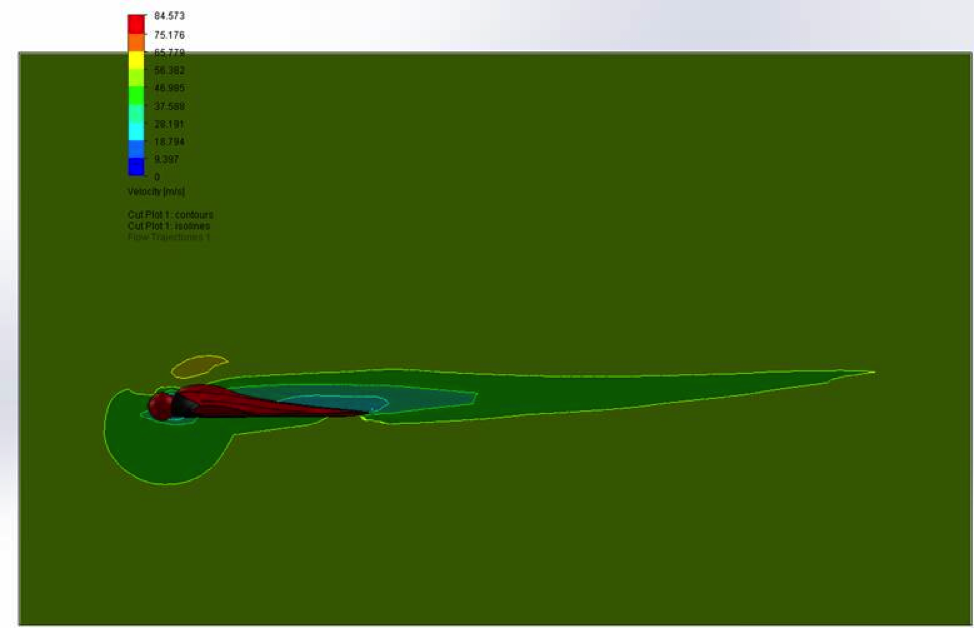 Figure 4. Velocity Cross section of a Squirrel Prototype (AoA not illustrated). The Center of Pressure is behind the pilot’s head.
Now I’m sure you’ve been excited to get to the part about Wingsuit Configuration (Formerly known as Body Position), but the single biggest barrier in wingsuit performance flying is overlooking Angle of Attack. So close your butt-cheeks, drop your elevators, and let’s talk AoA!
Angle of Attack:
Imagine you are standing on the side of a talus slope with a radar gun. Two wingsuit pilots are going to fly by, and you’re going to take a picture of them from the side and check their speed. They are both flying the same exact line. They are flying the same wingsuit. They have the same exit weight. And they are both exactly 20 feet off of the talus for the section of their line that we are observing them…
One is Scotty Bob, and as he zooms past you see that his arms are level with his shoulders and the angle of his efficient-looking position is sort of pointed “low”. He zooms past at 140mph on the radar gun. Scotty is flying well above MID speed – he has massive amounts of available lift to flare or maneuver.
The other pilot is Burbly Scott and he just started skydiving last year but he loves his new big wingsuit. Remember, Burbly is flying exactly the same line, at the same distance from the ground, and the same trajectory. Here he comes, and his arm position is such that his wrists are higher than his head (Dihedral), his knees are slightly bent, and it looks like he is actually arching a little… you can see that his head is actually kind of high, and it looks like he is just plowing through the air. The angle of his bent / swept / arched suit looks inefficient by comparison, it’s almost like his position is sort of pointed “high” compared to Scotty’s. You look down at the radar gun and it reads 85mph, definitely not impressive.
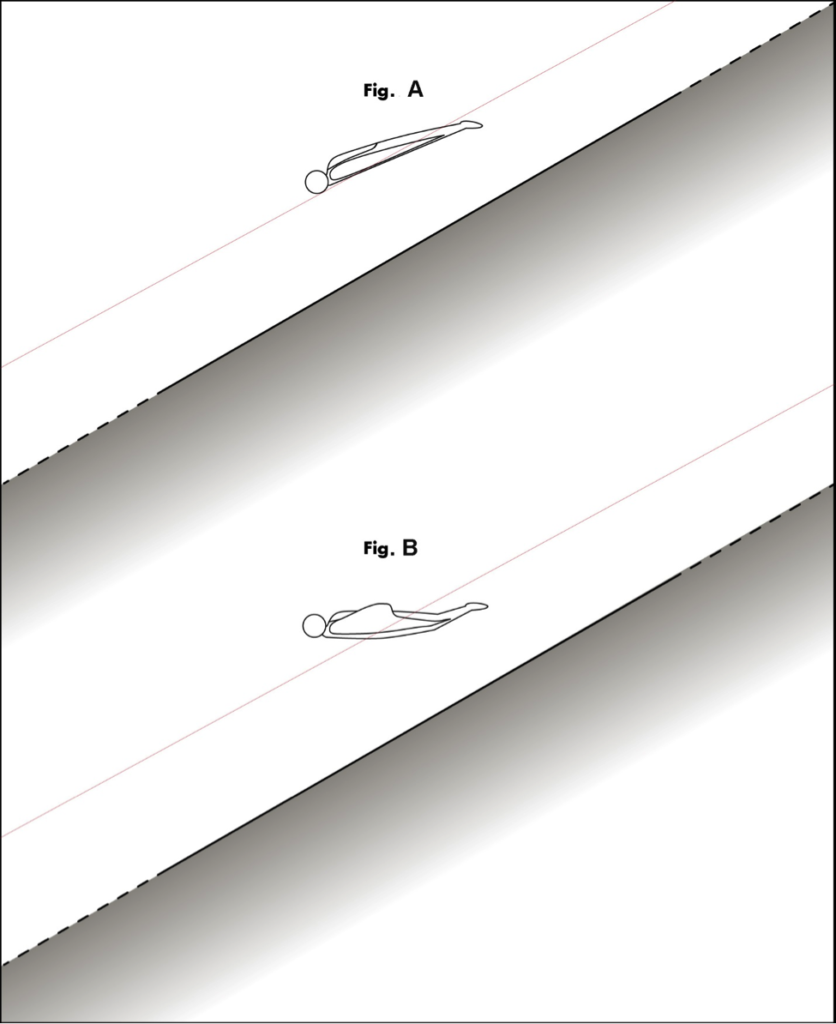
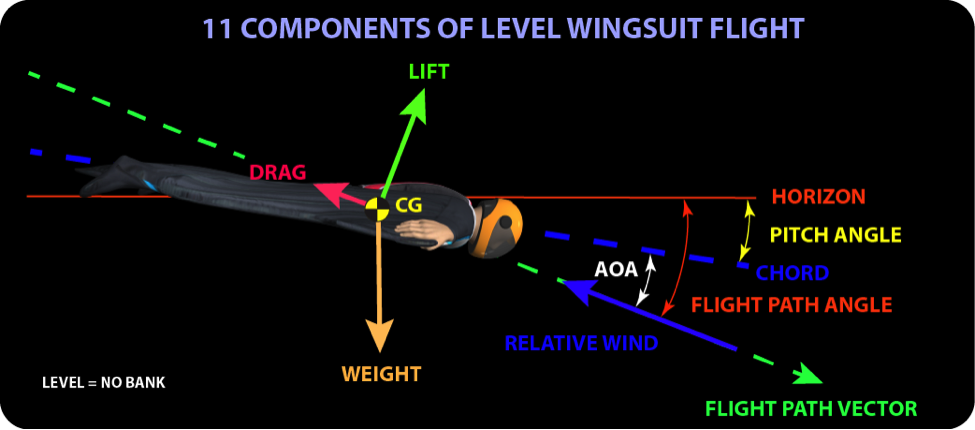
Technically, Angle of Attack is not related to the horizon, it does not define the direction you are flying, and it cannot be described as “steep” or “flat”. But don’t worry too much about that, all we need to know for our wingsuit application is illustrated in this drawing. The first guy (fig A) is doing it right. The second guy (fig B) is… “doing it”. (“yeeha burbly scott, yer doin it!”).
So how stupid and dangerous is Burbly Scott, really? The fact is that one can consistently “get away with” this wingsuit configuration on steep lines of flight. But the moment you take this wingsuit configuration over slightly flatter terrain, then: you. are. dead. We could say that a wingsuit pilot who relies on this more stable but highly inefficient wingsuit configuration is an accident waiting to happen. And it’s not just about WS BASE: Burbly Scott’s wingsuit configuration is the root cause of countless embarrassingly ugly and painfully slow and tragically boring wingsuit skydiving videos. It also happens to be a factor in dozens of wingsuit BASE fatalities.
|
SIDEBAR: AOA THOUGHTS Your AoA is the angle at which your body’s flat plane is pointing relative to the direction of flight, relative to the air mass. AoA is not flight angle… AoA is the angle at which you are pointing along your direction of flight. In gliding flight, a lower AoA means higher airspeed. A higher AoA means a lower airspeed. AoA is not glide ratio. A pilot must actively manage AoA. No wingsuit will automatically settle into the perfect AoA for each aspect of flight. |
When you think about speed and performance, think about AoA separately from body position (now known as Wingsuit Configuration!). AoA is the angle that you present yourself to the airmass. As you visualize acceleration, flaring up, deploying your parachute, transitioning to backflying, executing barrel rolls, or flocking with your friends, think about your AoA in the air mass. Doing so will increase your spatial awareness and allow you to improve your understanding of wingsuit flight, enabling a faster progression.
|
SIDEBAR: A NOTE ON “BODY POSITION” Rich Webb recently pointed out to me that Position is not an aerodynamic term. It’s a location term. In aviation, we use: 1) CONFIGURATION: Flaps down, flaps up, gear down, speed-brakes out, etc 2) ORIENTATION: Nose up, nose down, inverted, etc The two terms are isolated and not interchangeable. ‘Position’ is confusing, just like ‘Arms back’. Rich intentionally uses ‘Configuration’ and ‘Orientation’ [in TGB articles]. Therefore, moving forward, we will refer to Wingsuit Configuration, not Body Position. |
Wingsuit Configuration:
AoA is independent of wingsuit configuration.
The critical thing to understand here is that as long as your wingsuit configuration is mostly flat and resembles an inflated wingsuit, your configuration does not change your flight performance as much as a change in AoA will. You can hold an efficient configuration through a range of AoA and achieve performance in speed, distance, and time, without changing anything except your AoA. The same exact configuration held through different AoAs will yield different results. Sure, subtle changes in your wingsuit configuration will optimize your performance at each angle, but AoA is the major factor.
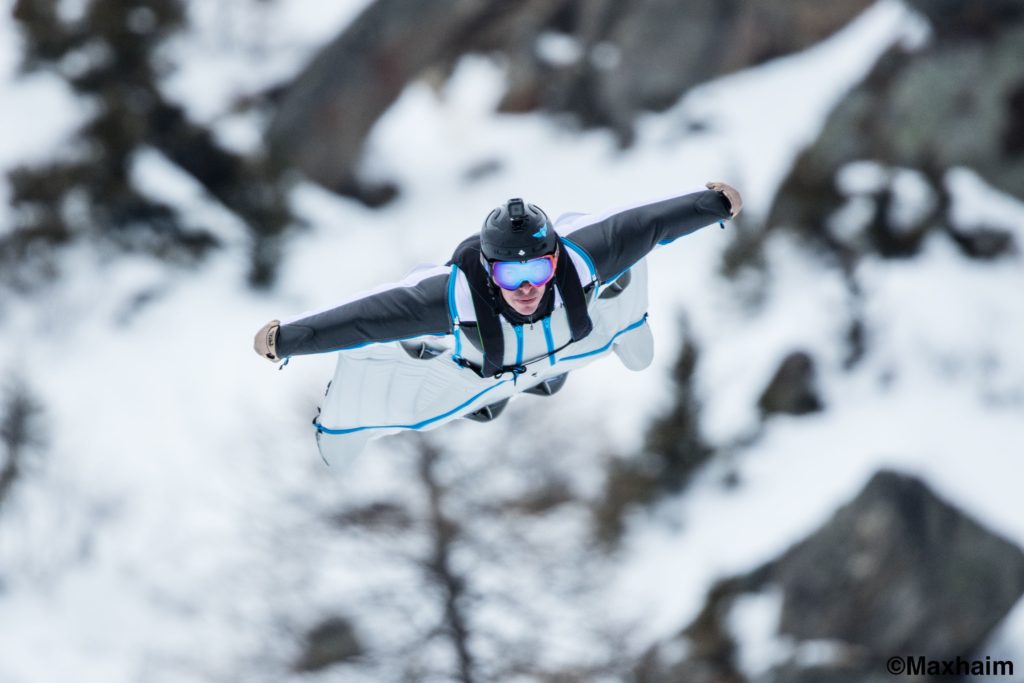 Matt G, with level arms and a flat wingsuit configuration. This is not an absolute max speed position but is well above MID speed and is suitable for terrain flight. Photo by Max Haim.
SPEED: The Efficient Configuration
In general, we want to arrange our bodies into a shape that allows air to flow across the top and bottom surfaces of our suits with minimal disturbances. We want curved airflow across the top of our wingsuit from shoulders to toes, and we want smooth airflow across the bottom. The easiest way to disrupt airflow on either surface is to bend our knees or distort our arm wings. Doing so disrupts the laminar flow on the surfaces of our suit, which is not good – distorting the top surface actually reduces the laminar flow that creates lift. This is bad for performance, so keep your legs straight, arms strong and level, and your toes pointing lengthwise tension into the suit.
If you were to picture yourself lying face down on the sidewalk, the max-performance configuration would mean that only your face and your tip-toes would be touching the ground, with your wingtips just barely off the ground. Your body would be forming a gently de-arched position from head to toe. It’s that simple. This smooth de-arched position encourages laminar airflow over the top surface of your wingsuit from head to toe, and a smooth bottom surface to deflect air in the most laminar fashion possible. Please note that saying we are creating an “airfoil” with our body would be inaccurate, and would deeply upset an aerodynamicist (the only airfoil present is built into your arm wing).
Bring full tension into your suit by “shrugging” your shoulders forward, pointing your toes as much as you can, and creating a slight concavity in the front of your torso. Push your forearms into the leading edge of the arm wings. Combining this position with a lower AoA (tilt lower) will yield the highest speeds. Increasing your AoA (tilting higher) will start you on a glide path for longer distances.
Want to slow down, or flare up? Think about changing your angle, not your wingsuit configuration – push your toes down toward Earth. You have an incredible amount of pitch control available in your legs. Never initiate a flare by bending your knees – that’s not flaring, that’s air-braking. Remember that results always depend on the angle of attack that you orient your wingsuit configuration into.
The key concept here is that AoA and wingsuit configuration are separate factors, and should be considered separately in your mind when you think about flying your wingsuit. As you strive to reach max performance in your suit, make adjustments to your angle and your configuration separately, and with an acute awareness of how the two factors combine and yield results.



As B.G. wrote in a book I brought from him: “Knowledge is lift!” Many thanks for these impressive explanations. The next flights will show if I can implement this lesson! 🙂
Love your work 🙂
THX!
Thank you very much!
OMG! you cracked me up on those first pics with the red pens!
Thank you for an awesome full on knowledge article!
Good for any flyer not only WS 🙂
Thanks for this article..Greate work and so true.. Hope everyone read all part 1-2-3. And also understand how inporten this is..
awesome – thank you very much!!!
Please – MAKE PART 4!!!
tnx very much!
Really good and very useful; thank you very much!